
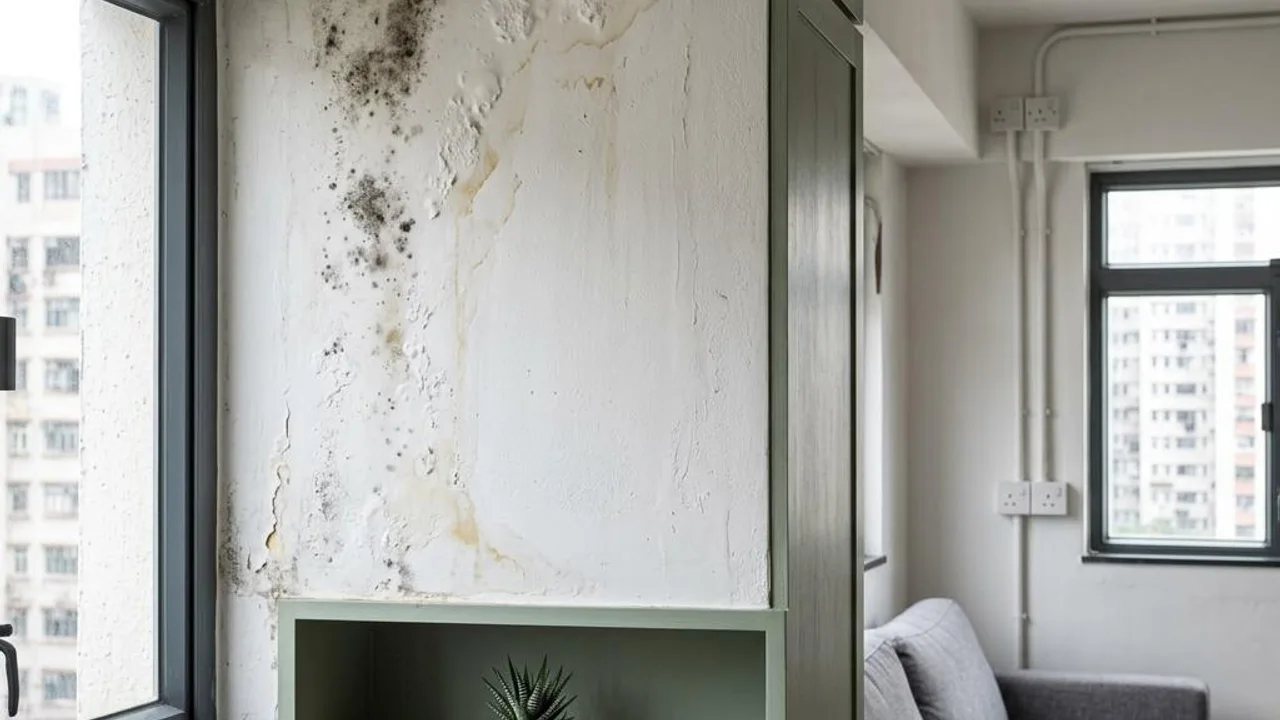
Is a window stain leakage or condensation? Record the conditions first
Rain, plumbing use and indoor-outdoor temperature differences provide different clues, but a single observation, stain colour or thermal image cannot establish the source. Condensation and leakage may coexist. Record weather, equipment use, surface moisture and changes in location, then seek appropriate investigation where needed.
Safety First: Priority Guidelines for Handling Water Seepage Incidents
When signs of water seepage, water stains, or mould appear at home, the primary consideration must be home safety. If water is found near power sockets, wall wiring, or large appliances, do not attempt to touch or handle the damp electrical components yourself to avoid electric shock. Immediately shut off the power to the relevant equipment, move away from the affected area, and notify the building management office or the relevant person in charge. Recording the situation is important, but it must never take precedence over safety.
When observing, avoid excessive actions. For example, do not climb out of windows to check the external wall, or remove ceiling panels at will to search for the water source. These actions are not only high-risk but may also cause unnecessary structural damage. Persistent water leakage requires professional assessment, and accurate and calm recording can provide more valuable diagnostic clues for subsequent professionals. Do not delay emergency measures just to preserve the scene.
- Shut off the power immediately when water is near sockets or electrical appliances
- Strictly forbidden to touch damp electrical components
- Prohibited from climbing or dismantling renovations in dangerous locations
- Notify the property management office first in an emergency
- Use professional assessment instead of DIY testing
Initial Recording: Positioning, Environment, and Specific Phenomena
Provided it is safe, the initial recording should be comprehensive. First, take wide-angle photos of the entire room or wall to indicate the orientation of the seepage within the unit, then take close-up photos of the water stains or mould spots. Note the weather conditions at the time, such as whether it has just rained heavily, whether air conditioning is in use, or if there is water usage activity nearby; these environmental factors are crucial for determining the cause.
When recording, clearly indicate whether the water is on the ceiling, wall corner, window edge, skirting board, or under cabinets. At the same time, observe and record visible physical phenomena, such as whether there is continuous dripping, wallpaper blistering, a mouldy smell, or material loosening, and archive the findings with the date and status at that time. These details will be key bargaining chips for future negotiations with the responsible party or when commissioning repairs; remain objective and retain the original versions.
- Mark the orientation of the seepage point and its relationship with doors, windows, and pipe positions
- Record the specific scope of water stains, dampness, and mould
- Note the time of discovery against weather and water usage conditions
- Maintain a combined record of long-range and close-up photos
- Restrict sensitive information about the floor unit to internal management files only
Observation Mode: Clarifying Causes and Avoiding Misjudgement
The causes of leakage are complex; condensation, surface moisture, and internal leakage look similar and cannot be judged solely by colour or touch. Homeowners should observe the patterns of the problem without increasing risk. For example, determine if water only appears when the air conditioner is running or if it has a direct causal link to rainfall. These observations can help professional repair staff focus their inspections on the appropriate pipes or external wall locations.
Remember, do not pour large amounts of water, block drainage outlets, or initiate unauthorized high-pressure water jet tests yourself to prove a leak. These actions may aggravate the damage or even alter the water flow, increasing the complexity of repairs. All high-risk tests (such as high-pressure water jet tests) must be properly authorized and performed by professionals. They are not DIY tasks; please simply maintain observation of the current status.
- Compile records of changes under past water usage and weather conditions
- Do not conclude the cause of seepage simply because the appearance is similar
- Prohibited from performing DIY sealing or high-pressure water injection tests
- Respect the scope of professional inspection and do not perform unauthorized operations
- Maintain objective factual records for professional assessment
Establishing a Timeline: The Core of Follow-up Work
Saving observation data from different dates in sequence can help engineers clarify the nature of the problem, such as whether the seepage expands under specific conditions, is intermittent, or changes with the seasons. It is recommended to use a fixed number for the same location, avoid drawing large marks directly on photos, and instead use annotations on copies of photos while keeping the original photos for follow-up verification.
Each time information is updated, clearly note the date, the newly expanded scope, and the phenomena, as well as actions taken or parties contacted that day. If the cause cannot be confirmed, mark it as 'Pending Investigation'. This systematic file management approach not only allows the responsible party to see the situation clearly at a glance but also effectively reduces communication misunderstandings, preventing poor repair results or the recurrence of problems due to omitted historical data.
- Set a unique issue number for seepage at the same location
- Save image records of each change in chronological order
- Annotate key points on photo copies for reference by both parties
- Leave undetermined factors for professional investigation
- Maintain a complete record of contacted parties and measures taken at the time
Observation and Subsequent Follow-up After Repairs
After repair work is completed, homeowners should record the repair scope and completion date in detail, and ask when the affected area can be returned to normal use. Do not perform large-scale water usage or water tests immediately after repairs as this may affect the curing of repair materials. Remember, a clean appearance does not mean the cause has been fully clarified. A period of observation is still needed to confirm that the problem will not recur under similar conditions.
If the problem reappears, continue using the original issue number and add new dates and phenomenon descriptions. This practice provides a clear comparison for subsequent reinspections. For engineers, trackable repair records prove whether they have thoroughly handled the problem rather than just providing cosmetic fixes. Homeowners should not relax until the problem is thoroughly resolved and should continue monitoring until the situation stabilizes.
- Confirm the repair scope and completion date
- Consult professionals regarding recommended observation and restart times
- Continue observation after repairs to confirm the cause is thoroughly resolved
- Use old files for comparison if phenomena recur
- Ensure observation records are clear enough to support maintenance requests
Arrange appropriate follow-up parties based on the affected location
After discovering water stains, first check with the management office whether the affected location involves public pipes, pipe ducts, or other units. Provide the orientation of the room, time of appearance, and photos to assist in arranging an inspection. Do not assume it is definitely a leak from the unit above just because the water stains are near the ceiling; the source and maintenance responsibility must still be confirmed based on investigation results, documents, and the actual scope.
If you suspect private pipes, waterproof layers, or other hidden locations are involved, explain the phenomenon to the relevant responsible party and let appropriate personnel evaluate whether further testing is needed. Confirm site access, possible affected areas, and recording methods in advance to avoid DIY wall demolition, floor chiselling, or prolonged water release to find the leak, which could increase damage.
- Provide location and time records first to assist the management office's check
- Separate the handling of observed phenomena, cause investigation, and responsibility confirmation
- Confirm permissions and safety arrangements before further testing
Distinguish observations, thermal clues and specialist tests
Thermal imaging shows surface temperature differences, not water paths inside a wall. A normal image does not rule out intermittent leakage. Normal-use water observations, high-pressure water-jet testing and ponding tests have different purposes and conditions. Confirm responsibility, permission, scope and fees for extra tests; owners should not block drains or flood surfaces.
FAQs
If there is wall seepage but the source is uncertain, should I drill holes in the wall to test?
Definitely not. Self-drilling or dismantling the structure may damage hidden pipes or wiring and will obscure evidence at the scene; it should be left as is and commissioned to professionals for investigation.
The seepage becomes serious after rain; is this proof that it is caused by external wall cracks?
Visual phenomena are for reference only and cannot be directly used as a professional conclusion. Seepage causes are diverse; even if phenomena are related, they must be assessed by qualified personnel considering environmental factors.
The repair company claims it is fixed, but water stains appeared again a few days later; what should I do?
Please update the record immediately using the same issue number, take photos of the new phenomena, contact the repair party to report the situation, and keep the complete timeline record as comparison data for subsequent follow-up.