
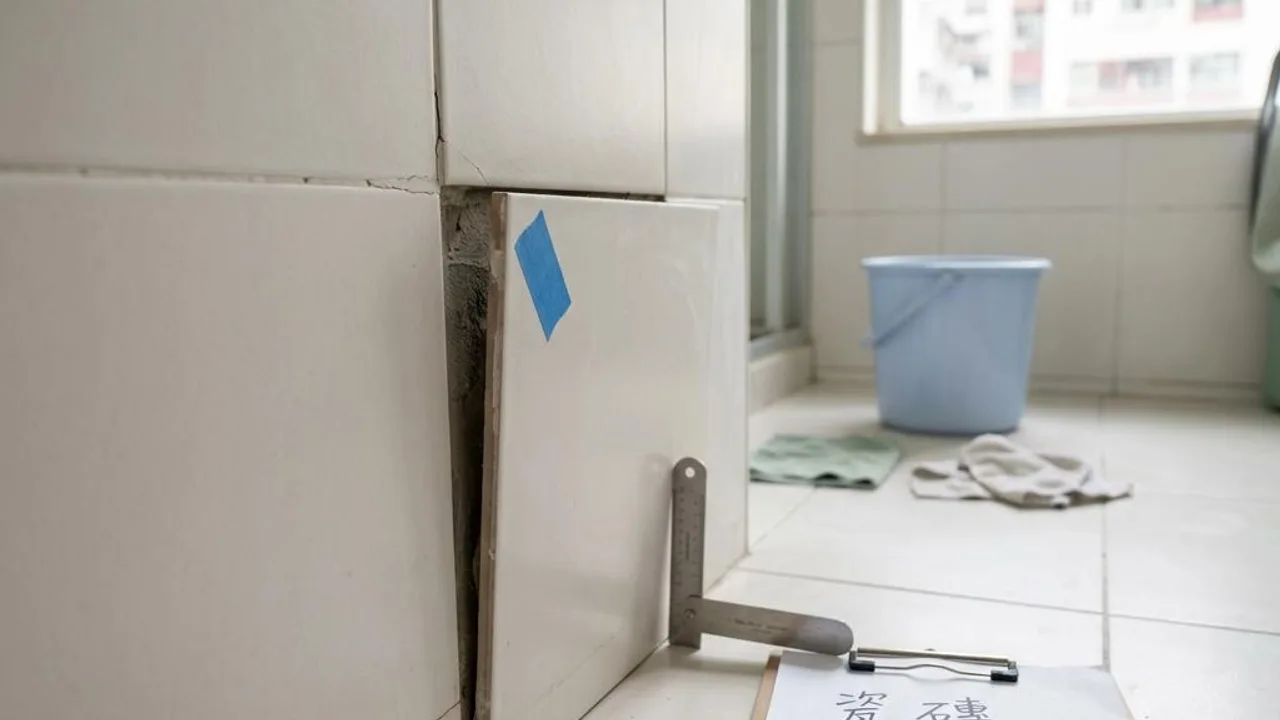
Must a hollow-sounding tile be removed? Sound is not the only factor
A different tapping sound does not by itself prove imminent detachment, and a percentage alone cannot determine complete replacement. Consider whether the tile is on a wall or floor, visible cracking, lifting or movement, installation information and agreed requirements. An online percentage is not a universal substitute for site assessment or contractual specifications.
Hollow tile phenomenon and its common causes
Hollow Tiles refers to the condition where the tile or marble finish on interior walls or floors lacks sufficient adhesion to the base plaster or concrete structure. This condition is not uncommon in new residential buildings and is often caused by insufficient adhesion of the cement mortar, failure of the substrate treatment to meet standards during construction, differences in the moisture content of the materials themselves, or thermal expansion and contraction caused by later temperature differences.
Although hollow tiles do not necessarily cause immediate tile shedding, they represent a lack of attention to construction details. If the problem occurs on floors that are frequently walked upon or on kitchen and bathroom walls frequently exposed to moisture, in the long run, minor changes in the structural layer or the influence of gravity might expand the hollow area, increasing the risk of tiles loosening, lifting, or even cracking. Therefore, it must be thoroughly investigated during the property handover.
- Improper proportioning of cement mortar
- Differences in thermal expansion coefficients between the substrate and surface materials
- Insufficiently thorough cleaning of the substrate during construction
- Influence of external forces or vibrations during the curing period
Professional and safe judgment techniques
When conducting a hollow tile inspection, the most effective method is to use a professional hollow tile hammer or a hard object to gently tap the tiles. The sound of a normal solid tile should be dull and low, while areas with hollow tiles will produce a crisp, hollow sound. Patience is essential when checking, as hollow spots are sometimes limited to a corner of a tile, requiring each tile and corner to be tapped and tested to accurately locate them.
After discovering abnormal points, you should use easy-to-remove stickers to mark the tile surface for subsequent recording. At the same time, inspection personnel need to coordinate with visual observations, noting whether there are cracks at the tile edges, falling off of joint grout, tile lifting, or color differences; these are often symptoms associated with severe hollow tiles and must be strictly monitored and recorded.
- Tap the four corners and the centre point of the tiles to confirm.
- Check the tile joints for cracks or dust.
- Mark the boundaries of hollow tiles to help the defect rectification technician identify them.
Evaluate the priority order for defect rectification
Not all hollow tiles require the same approach. For small-scale issues involving only slight hollowness in non-load-bearing, dry wall areas, the risk is relatively low. However, if the area of the hollow tile is large, located in high-traffic doorways, or on kitchen walls subject to long-term humid climates, the risk of it detaching after years of use increases significantly, and these cases must be followed up.
It is recommended that the owner quantifies the hollow tile condition during recording, such as noting the number of hollow tiles, their density, and whether they are accompanied by cracks. Reporting this information accurately to the developer or contractor can effectively drive the defect rectification process. In the face of large-scale hollow tiles, one should request a tile replacement or structural grouting to prevent future trouble.
- Hollow tiles in high-humidity areas such as kitchens and bathrooms
- Load-bearing locations such as corridors and door thresholds
- Tiles with cracks or that have already lifted
- Large-scale continuous areas of hollow tiles
Standardized recording and defect rectification reports
Effective record-keeping is the foundation of successful defect rectification. Owners should clearly mark each hollow tile location on the floor plan, complemented by photos of the overall environment and close-ups. The photos should clearly show the tile number or the specific wall orientation, allowing the defect rectification technician to quickly lock onto the affected position and avoid misunderstandings or delays during the communication process.
When writing a report, describe the problem in detail, for example: 'Four consecutive hollow tiles on the wall on the left side of the living area.' For complex walls, it is recommended to label the tiles in a grid and save photos as evidence for inspection. Clear records not only increase repair efficiency but also ensure that the contractor cannot delay maintenance progress on the grounds of 'unknown location.'
- Accurately mark the orientation on the floor plan
- Take close-up photos including reference objects
- Use numbered records to avoid communication gaps
Construction observations and safety bottom lines
During the property inspection, the owner is strictly forbidden from using violent testing, such as hitting with heavy objects, jumping or stepping forcefully, or even forcibly removing tiles. Such behavior will not only directly damage the surface structure but may also trigger sudden bursting, causing personal injury. If signs of obvious bulging or loosening are found, move away from the scene immediately and notify the inspector.
Furthermore, a professional property inspection record can only provide observations of phenomena; one cannot conclude the specific underlying cause or specify a repair method based solely on the knocking sound. Any repair plan should be proposed by a qualified contractor after an on-site assessment. As an owner, protecting personal safety and maintaining the status quo is the primary task; do not intervene in potentially dangerous areas out of curiosity or impulse.
- Strictly forbidden to forcibly remove or hit tiles hard
- Avoid approaching if obvious bulging is found
- Visual recording is primary to avoid personal risk
Rigorous review process after patching
After the repairs are completed, the owner must reserve sufficient time for the materials to set. Before conducting a reinspection, be sure to communicate and confirm with the contractor that the materials have fully cured and are suitable for testing. Do not re-test immediately after being notified of completion by the contractor to avoid affecting the repair results. During the reinspection, use the original problem numbers to check one by one whether the color of the repaired area matches and if the tile joints are neat.
The reinspection is not limited to the repaired area itself, but also pays attention to whether there is any new damage to the surrounding area. For treated hollow tiles, focus on checking whether the sound has become solid. If the repair result is found to be unsatisfactory, such as still having obvious hollowness or serious color differences, it should be recorded as a 'pending item' and a request for re-inspection should be made to ensure that the handover quality meets expectations.
- Conduct tests only after confirming material curing
- Check the repair results of the original issues and the surrounding situation
- Perform item-by-item inspection and verification using the original numbers
Record the area without escalating impact
Record the room, wall or floor location, material and visible condition so the responsible party can confirm repairs and effects on adjacent areas. Keep clear and notify them if there is movement, falling material or sharp damage. Do not repeatedly strike, pry or remove tiles. After repairs, check the original defect and any new surrounding damage when conditions permit.
FAQs
When will the property inspection report be sent and how to obtain photos?
The electronic inspection report from the company is usually issued on the next working day and does not include photos. It is recommended that owners prepare their own photography equipment to take records at the inspection site.
If the repaired tiles still have hollow sounds, can a re-inspection be carried out for free?
No. Re-inspection after defect rectification is an independent professional service and is not a free item. Please confirm the relevant terms with the contractor before carrying out repairs.
Can I repair hollow tiles myself with cement or glue when I find them?
It is strongly recommended not to handle it yourself. Owners should record the phenomenon and notify the developer or a qualified contractor for assessment. Any act of self-demolition or grouting involves safety and construction risks.