The importance of bathroom ceiling inspection
The bathroom ceiling is a key barrier for maintaining bathroom hygiene and building lifespan. Because the bathroom is in constant contact with water vapor, the ceiling serves not only an aesthetic function but also acts as protection against leakage from upstairs and internal moisture intrusion. If there are defects during construction, it will lead to future paint peeling, mold growth, and may even affect the stability of the internal joist structure.
Owners should treat ceiling inspection as a priority during the handover. The condition of the ceiling directly reflects the moisture-proof performance and the effectiveness of the waterproofing works. By carefully observing whether the ceiling surface has discoloration or cracks, you can identify hidden dangers early and avoid internal material damage caused by long-term humidity, which may even affect home health.
- Observe whether the surface coating shows bubbles, water stains, or peeling
- Check the integrity of all joint locations between the ceiling and walls
- Assess whether the extraction system operates correctly and can effectively exhaust moisture
- Take note if there is any abnormal spread of mold on the ceiling
The structural composition of bathroom ceilings
Bathroom ceilings are usually composed of a concrete base, joist framework, decorative panels, and moisture-proof/waterproof coatings. The concrete base is responsible for weight-bearing, and its dryness is crucial for mold prevention. If the base contains too much moisture before boarding up, the trapped moisture in the sealed space easily leads to mold in the internal structure or warping of the decorative surface.
The combination of the moisture-proof layer and facing materials determines the durability of the ceiling. Professional installation uses rust-resistant joist frames and inserts moisture-proof materials between the panels and the concrete. Owners need to understand that all layers must be tightly bonded; if the sealing craft is poor, it easily leads to condensation accumulation, which will affect the visual effect and service life of the ceiling in the long run.
- The concrete base must remain dry and structurally intact
- Metal joist frames must have rust-resistant and anti-corrosion properties
- The waterproof and moisture-proof layer must strictly block moisture from entering
- Decorative panels should be selected from materials with high moisture resistance
Identifying common engineering defects
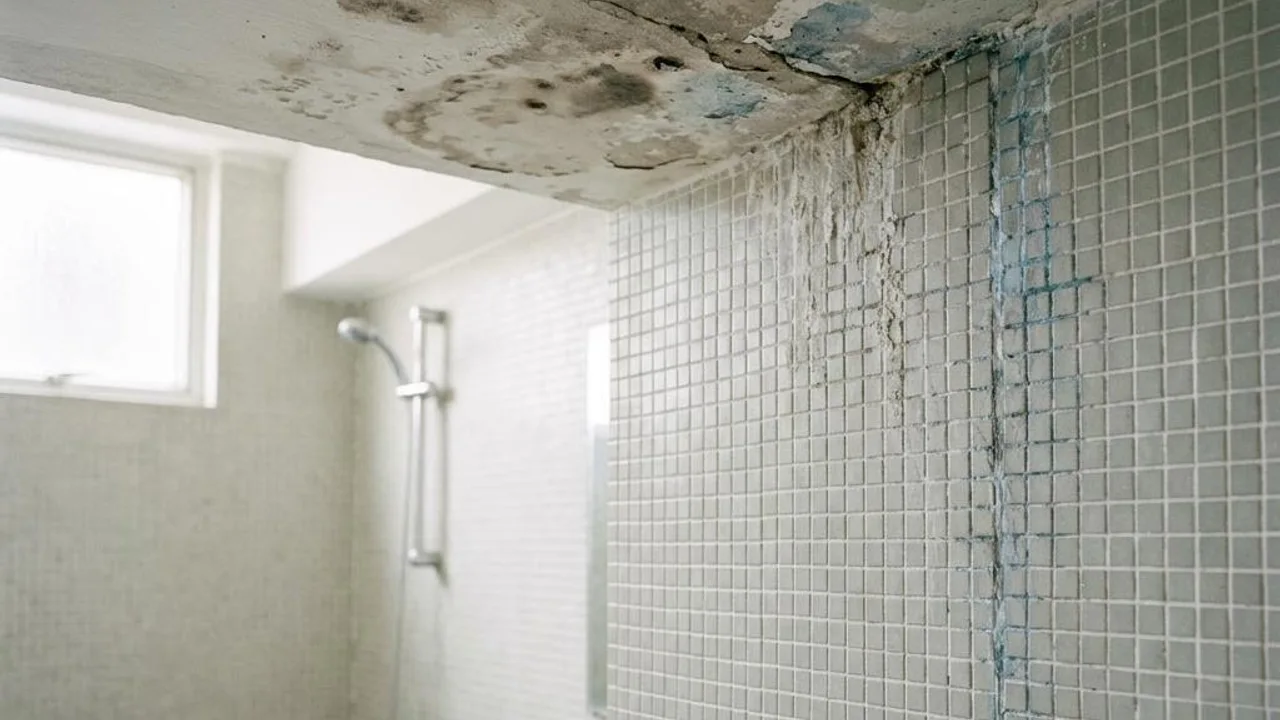
Leakage is the most serious hidden danger for bathroom ceilings, usually originating from broken drainage pipes upstairs or a failed waterproof layer. Long-term water seepage causes gypsum board to soften, decorative paint to peel, and accelerates framework corrosion. When yellow-brown water stains or paint bubbling are detected on the surface, you should immediately heighten your alertness; do not just patch the paint, you must uncover the source.
Environmental factors can also trigger mold and cracking. If anti-mold processes were not considered during renovation, or if bathroom ventilation is insufficient, long-term stagnation of humidity will breed mold. Cracks at the joints between the ceiling and walls are often related to structural shrinkage or insufficient sealing during installation. Owners should pay attention to these defect locations and observe if they show abnormalities as the ambient humidity changes.
- Note whether there are water marks or yellow-brown signs left by water seepage on the surface
- Check if the finish shows mold, black spots, or coating peeling
- Observe if the paint has bubbles, cracks, or abnormal discoloration
- Check if there are obvious shrinkage cracks or poor sealing at corner positions
Operational details of the inspection
When performing a ceiling inspection, owners can use the naked eye to observe the flatness and color uniformity of every corner. The focus is to find any abnormal color differences or protrusions; these are often early indicators of internal dampness or water accumulation. At the same time, test the exhaust capacity of the extraction fan to ensure that bathroom moisture can be quickly exhausted, avoiding an overly humid indoor environment.
Beyond visual inspection, owners should also look for cracks or deformation at ceiling joints, which may result from unstable installation or thermal expansion and contraction. If any structural abnormalities are found during the inspection, such as obvious sagging or large-scale deformation, seek professionals to assist in determining the root cause with more precise instruments.
- Use visual observation to check ceiling flatness and surface condition
- Carefully inspect all joints for tight sealing
- Focus on detecting any potential water stains or signs of discoloration
- Confirm that the lighting and exhaust fan switches and operations are normal
Strategies for handling ceiling problems
Once a serious leak is discovered, the primary task is to trace the source. This may involve a broken water pipe upstairs or damage to the waterproof layer, and you must hire qualified contractors for repairs rather than just performing surface patching. Only replace the damaged ceiling materials after the waterproofing work is finished and ensured to be dry, to avoid recurring problems.
For mold or cracks, it is recommended to treat the symptoms appropriately. Mild mold can be handled with specialized cleaning agents, but if the mold has penetrated the facing material, damaged parts must be replaced. For joint cracks, elastic repair materials can be used for sealing. At the same time, improving the bathroom’s ventilation efficiency is a long-term solution to prevent the situation from worsening.
- Water seepage must be thoroughly traced and the source repaired before proceeding with follow-up work
- For deeply molded parts, consider replacement rather than just surface cleaning
- Use elastic caulking material to deal with joint cracks
- Improve bathroom exhaust equipment to maintain a long-term low-humidity environment
FAQs
If small bubbles are found on the bathroom ceiling paint surface, is this water seepage?
Paint bubbles are not necessarily all caused by water seepage; they can also be caused by moisture on the surface before applying the finish during construction, or poor adhesion between the paint layer and the base. However, in the high-humidity environment of a bathroom, bubbles usually imply internal moisture accumulation. It is recommended to observe if the bubbles are near water pipes and ask professionals to check for signs of leakage.
Can DIY repair of ceiling cracks completely solve the bathroom’s water leakage problem?
No. Cracks are just a surface phenomenon. If there is a persistent seepage problem behind them, simply filling the cracks will not solve the source of the leak, and may even cause moisture to be locked inside, aggravating the damage to the ceiling structure. The source of the leak must be identified and repaired before treating the surface decoration.
How can one judge whether bathroom ceiling mold is caused by poor ventilation or leakage from upstairs?
Mold caused by poor ventilation is usually more uniform, often found in corners or surfaces where condensation easily accumulates, and mold is often spotty. If caused by upstairs leakage, mold is usually accompanied by paint peeling, discoloration, or softening of the ceiling; affected areas usually present as large patches of water stains, and mold grows at a faster rate.